How laboratory setup should looks and works
CALMET "Online Experimentation: Emerging Technologies and IoT"
General scheme of the laboratory work:
1. There is organized a zone containing:
o a layer of sand (or other hygroscopic material),
o free air space above the sand layer passing directly to the airspace of the laboratory facilities (without separating them by hermetical barriers); there is a variant of micro greenhouse formation separated from the lab environment by a hermetical barrier.
2. There is organized a managed irrigation sand system, the distribution of irrigation can be controlled.
3. In the sand layer there are several humidity sensors, over the sand surface there are humidity and air temperature sensors at several spots.
4. Management of the entire system and environmental parameters collection are done with the help of Arduino, computer, etc. All processes are displayed in a template document.
The laboratory device allows:
· To form different microstructures of the hygroscopic layer (variable depth of a layer, hygroscopic material variables, etc.).
· To set different characteristics of irrigation (drip irrigation, areal irrigation, irrigation of various intensity (drip and areal, regular and irregular irrigation (as to space), irregular irrigation as to time).
· To record real-time sensor readings and display them in graphs.
· To manage the irrigation process through web interface.
· To display experimental data in the work template (in real time and in the mode of data output for selected periods of time).
1. Arduino Board
2. Physical quantities sensors
Soil moisture sensor
Air temperature and humidity sensor
Thermistors
3. Micropumps
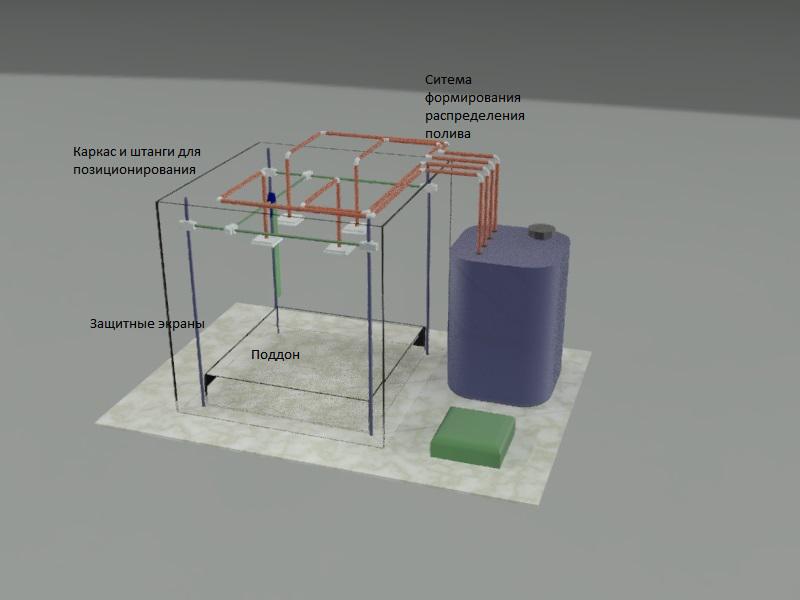
4. Frame and rods for sensors positioning
5. Tray for hygroscopic medium formation
6. Irrigation distribution system
7. Device wiring
8. Computer
9. Monitor, keyboard, mouse
10. Protective screens
11. Fastening elements
12. Basis of the laboratory device (working platform)
13. Indicators of device operation modes
14. Water tank, water pipes
15. Tools for hygroscopic material layer preparation and formation
It is necessary to become familiar with the diagram of the laboratory device, to identify its parts
How laboratory setup should looks and works
0. To assemble the laboratory device.
1. To configure the device connection to the Internet of Things server.
2. To prepare the experiment working space of the web-page:
to create tables, to create and host control elements, to create and host interfaces of experimental data display.
3. To turn on the device power.
4. To record the initial readings of all instruments (before irrigation).
5. To set the irrigation parameters: sprinkler type and location (to record all data in the experiment configuration table).
6. To observe the process dynamics. To capture interesting features of the process in the text form.
7. To save the data of the experiment.
List of questions
Procedure:
1. Install the frame for sensors fastening to the working platform.
2. Install the Arduino controller on the working platform and secure it.
3. Install the water tank on the working platform.
4. Place the container for hygroscopic material inside the frame.
5. Install rods for sensors positioning.
6. Install sensors on the rods.
7. Connect sensors to the Arduino platform. Connect the Arduino platform to the power supply.
8. Fix the connecting wires on the rods and other structural elements.
9. Install the water tank on the working platform and fix it.
10. Install irrigation system.
11. Install the submersible micro pump in the water tank.
12. Connect the submersible pump with watering system by water pipes.
13. Shape the container bottom relief for hygroscopic material.
14. Fill the hygroscopic material container with sand or other hygroscopic material.
15. Place the soil moisture sensors in the hygroscopic material.
16. Pour water into the water tank.
17. Place protective screens.
As an additional task to this phase of the work:
“Development and manufacturing of a sensor measuring the intensity of precipitation (irrigation) using 3D printer”.
Connecting devices to Alterozoom using the iotkit-agent
Presentation about Alterozoom IoT abilities
Procedure:
Management of the laboratory device:
Air temperature graph of the first sensor:
Air temperature graph of the second sensor:
Air humidity graph of the second sensor:
Soil moisture graph of the first sensor:
Soil moisture graph of the second sensor:
Soil temperature graph of the first sensor in Kelvin degrees:
Soil temperature graph of the second sensor in Kelvin degrees:
Soil temperature graph of the third sensor in Kelvin degrees:
Disassembly of the experimental device is performed in the order reverse to assembly.
Wet hygroscopic material is placed in a drying unit.
All wet parts of the device should be wiped with absorbent cloth.
Fill in the table
|
Learnt earlier / was able to |
Have learnt / am able to |
Would like to learn / to be able |
|
|
|
|
|
|
|
|
|
|
|
|